Vault
Use ADFS for OIDC authentication
Configure your Vault instance to work with Active Directory Federation Services (ADFS) and use ADFS accounts with OIDC for Vault login.
Before you start
- You must have Vault v1.15.0+.
- You must be running ADFS on Windows Server.
- You must have an OIDC client secret from your ADFS instance.
- You must know your Vault admin token. If you do not have a valid admin token, you can generate a new token in the Vault UI or with the Vault CLI.
Step 1: Enable the OIDC authN method for Vault
Save your Vault instance URL to the
VAULT_ADDRenvironment variable:$ export VAULT_ADDR="<URL_FOR_YOUR_VAULT_INSTALLATION>"For example:
$ export VAULT_ADDR="https://myvault.example.com:8200"Save your Vault instance URL to the
VAULT_TOKENenvironment variable:$ export VAULT_TOKEN="<YOUR_VAULT_ACCESS_TOKEN>"For example:
$ export VAULT_TOKEN="XXXXXXXX-XXXX-XXXX-XXXX-XXXXXXXXXXXX"If you use Vault Enterprise or Vault HCP, set the namespace where you have the OIDC plugin mounted to the
VAULT_NAMESPACEenvironment variable:$ export VAULT_NAMESPACE="<OIDC_NAMESPACE>"For example:
$ export VAULT_NAMESPACE="oidc-ns"Enable the OIDC authentication plugin:
$ vault auth enable -path=<YOUR_OIDC_MOUNT_PATH> oidcFor example:
$ vault auth enable -path=/adfs oidc
Step 2: Create a new application group in ADFS
Save the client ID
Make note of the 32-character client identifier provided by ADFS for your
new application group (for example, d879d6fb-d2de-4596-b39c-191b2f83c03f).
You will need the client ID to configure your OIDC plugin for Vault.
- Open your Windows Server UI.
- Go to the Server Manager screen and click Tools.
- Select AD FS Management.
- Right-click on Application Groups and select Add Application Group....
- Follow the prompts to create a new application group with the following
information:
- Name: Vault
- Description: a short description explaining the purpose of the application group. For example, "Enable access to Vault".
- Application type: Server application
- Redirect URI: add the callback URL of your OIDC plugin for web
redirects and the local OIDC callback URL for Vault CLI redirects. For
example,
https://myvault.example.com:8200/ui/vault/auth/<YOUR_OIDC_MOUNT_PATH>/oidc/callbackandhttp://localhost:8250/oidc/callback.
- Check the Generate a shared secret box and save the secret string.
- Confirm the application group details and correct information before closing.
Step 3: Configure the webhook in ADFS
- Open the Vault application group in from the ADFS management screen.
- Click Add application...
- Select Web API.
- Follow the prompts to configure a new webhook with the following information:
- Identifier: the client ID of your application group
- Access control policy: select an existing policy or
Permit everyone - Enable
allatclaims,email,openid, andprofile
- Select the new webhook (Vault - Web API) from the properties screen of the Vault application group.
- Open the Issuance Transform Rules tab.
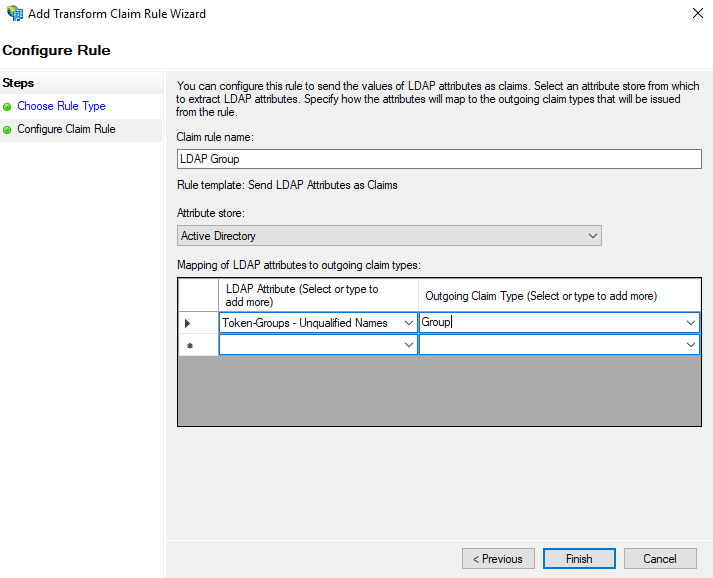
- Click Add Rule... and follow the prompts to create a new authentication
rule with the following information:
- Select Send LDAP Attributes as Claims
- Rule name:
LDAP Group - Attribute store:
Active Directory - LDAP attribute:
Token-Groups - Unqualified Names - Outgoing claim type:
Group
Step 4: Create a default ADFS role in Vault
Use the vault write CLI command to create a default role for users
authenticating with ADFS where:
ADFS_APPLICATION_GROUP_CLIENT_IDis the client ID provided by ADFS.YOUR_OIDC_MOUNT_PATHis the mount path for the OIDC plugin.. For example,adfs.ADFS_ROLEis the name of your role. For example,adfs-default.
$ vault write auth/<YOUR_OIDC_MOUNT_PATH>/role/<ADFS_ROLE> \
  bound_audiences="<ADFS_APPLICATION_GROUP_CLIENT_ID>" \
  allowed_redirect_uris="${VAULT_ADDR}/ui/vault/auth/<YOUR_OIDC_MOUNT_PATH>/oidc/callback" \
  allowed_redirect_uris="http://localhost:8250/oidc/callback" \
  user_claim="upn" groups_claim="group" token_policies="default"
Tip
Using upn value for user_claim tells Vault to consider the user email
associated with the ADFS authentication token as an entity alias.
Step 5: Configure the OIDC plugin
Use the client ID and shared secret for your ADFS application group to finish configuring the OIDC plugin.
Use the vault write CLI command to save the configuration details for the OIDC
plugin where:
ADFS_URLis the discovery URL for your ADFS instance. For example,https://adfs.example.com/adfsADFS_APPLICATION_GROUP_CLIENT_IDis the client ID provided by ADFS.YOUR_OIDC_MOUNT_PATHis the mount path for the OIDC plugin.. For example,adfs.ADFS_APPLICATION_GROUP_SECRETis the shared secret for your ADFS application group.ADFS_ROLEis the name of your role. For example,adfs-default.
$ vault write auth/<YOUR_OIDC_MOUNT_PATH>/config \
  oidc_discovery_url="<ADFS_URL>" \
  oidc_client_id="<ADFS_APPLICATION_GROUP_CLIENT_ID>" \
  oidc_client_secret="<ADFS_APPLICATION_GROUP_SECRET>" \
  default_role="<ADFS_ROLE>"
OPTIONAL: Link Active Directory groups to Vault
Enable the KV secret engine in Vault for ADFS:
$ vault secrets enable -path=<ADFS_KV_PLUGIN_PATH> kv-v2For example:
$ vault secrets enable -path=adfs-kv kv-v2Create a read-only policy against the KV plugin for ADFS:
$ vault policy write <RO_ADFS_POLICY_NAME> - << EOF
# Read and list policy for the ADFS KV mount
path "<ADFS_KV_PLUGIN_PATH>/*" {
  capabilities = ["read", "list"]
}
EOF
For example:
 $ vault policy write read-adfs-test - << EOF
 # Read and list policy for the ADFS KV mount
 path "adfs-kv/*" {
   capabilities = ["read", "list"]
 }
 EOF
Write a test value to the KV plugin:
$ vault kv put <ADFS_KV_PLUGIN_PATH>/test test_key="test value"For example:
$ vault kv put adfs-kv/test test_key="test value"
Now you can create a Vault group and link to an AD group:
- Create an external group in Vault and save the group ID to a file named
group_id.txt:$ vault write \ -format=json \ identity/group name="<YOUR_NEW_VAULT_GROUP_NAME>" \ policies="<RO_ADFS_POLICY_NAME>" \ type="external" | jq -r ".data.id" > group_id.txt - Retrieve the mount accessor for the ADFS authentication method and save it to
a file named
accessor_adfs.txt:$ vault auth list -format=json | \ jq -r '.["<YOUR_OIDC_MOUNT_PATH>/"].accessor' > \ accessor_adfs.txt - Create a group alias:
$ vault write identity/group-alias \ name="<YOUR_EXISTING_AD_GROUP>" \ mount_accessor=$(cat accessor_adfs.txt) \ canonical_id="$(cat group_id.txt)" - Login to Vault as an AD user who is a member of YOUR_EXISTING_AD_GROUP.
- Read your test value from the KV plugin:
$ vault kv list -mount=secret <ADFS_KV_PLUGIN_PATH>/test
